If you find this website useful, please check out my books or visit my Amazon Author page. Or even Buy Me a Coffee!
3D Printing for Model Engineers
3D Printing for Model Engineers
Browse this category to finds and download many of the example projects from my book, 3D Printing for Model Engineers, to be published early in 2018.
Since the release of the first commercially available 3D printer in 2009, a thriving consumer market has developed, with a huge variety of kits now available for the home constructor. In their short existence, these printers have developed into capable machines able to make robust and useful objects in a wide range of materials. 3D Printing for Model Engineers - A Practical Guide provides the first truly comprehensive guide to 3D printing in the context of other creative engineering-based hobbies. It covers using 3D Computer Aided Design; 3D printing materials and best practice; joining and finishing 3D printed parts; making your own metal castings from 3D printed parts and building your own 3D printer. Filled with real world examples and applications of 3D printing, this book is based on practical experience and is the essential guide to getting the most from your 3D printer. Illustrated throughout with 446 colour images.
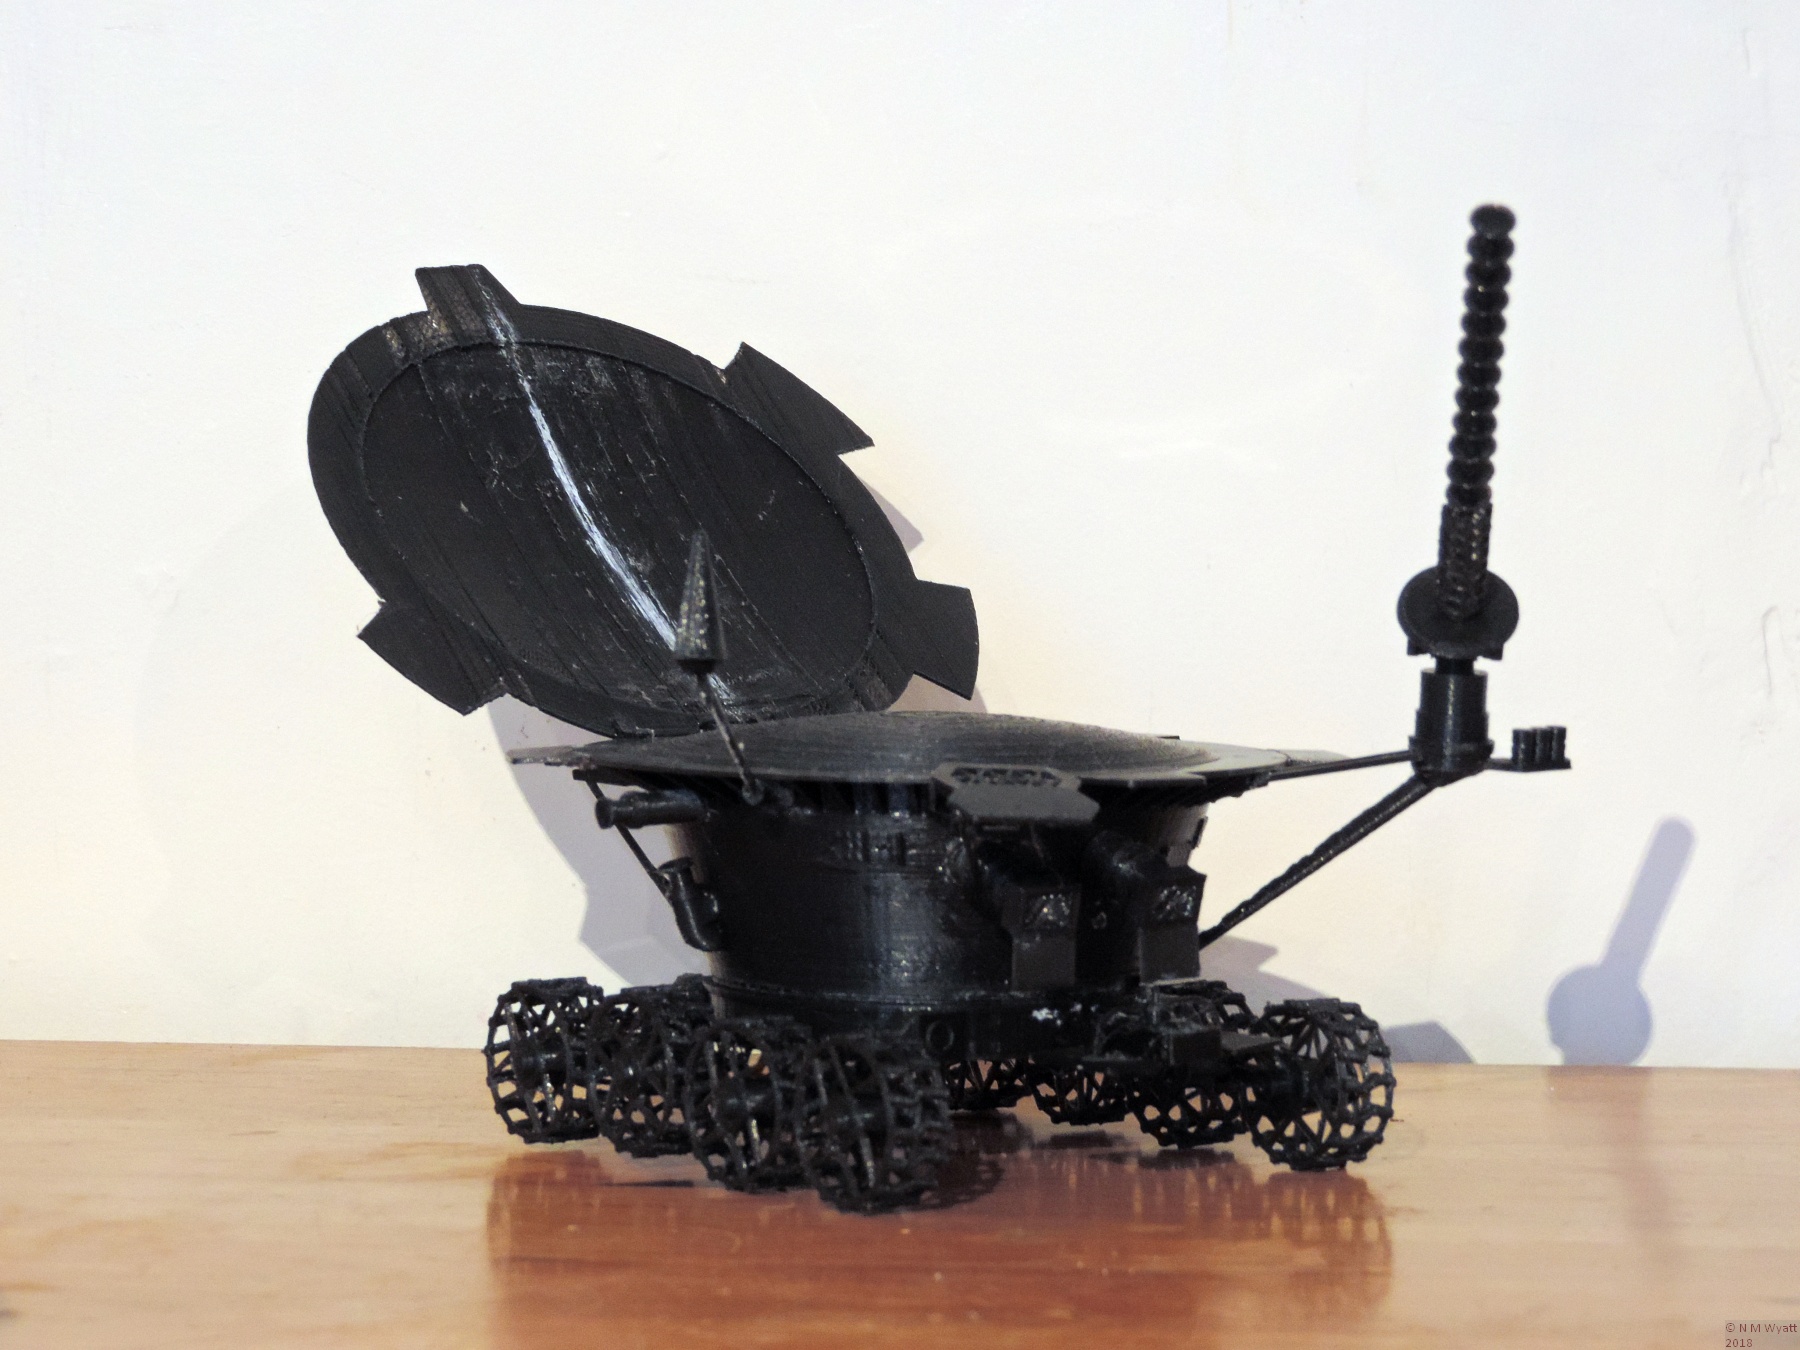
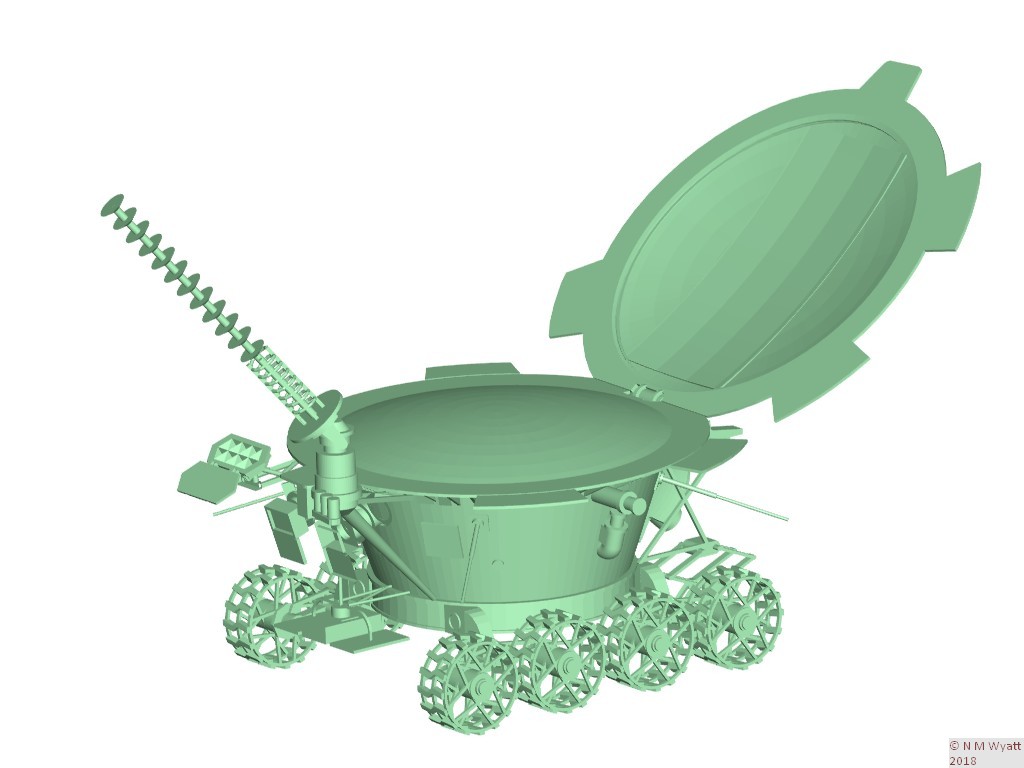
Lunokhod 1 and 2 were a pair of exceptionally successful robotic moon rovers that the Soviet Union sent to the moon in 1970 and 1973. Owing to the politics of the time this remarkable achievement went largely unnoticed in the west.
The eight-wheeled rovers were about the size of a small car, and in fact they were intended to act as safety/escape vehicles to support manned lunar expeditions.
Lunokhod '0' was destroyed when its launch vehicle exploded in 1969, but Lunokhod's 1 and 2 were successful. Lunokhod 3 was never launched and is on display in the Lavochin Museum.
I had a fascination with the Lunokhod program as a youngster, fuelled by the almost complete lack of information about the missions. When I got a 3D printer I discovered that no-one appears to have made one before, although there are some excellent conventional models. So I put that right and made my own Lunokhod 1.
A 3D printed Lunokhod
You can download STL files to print your own Lunokod using the link at the bottom of this page.
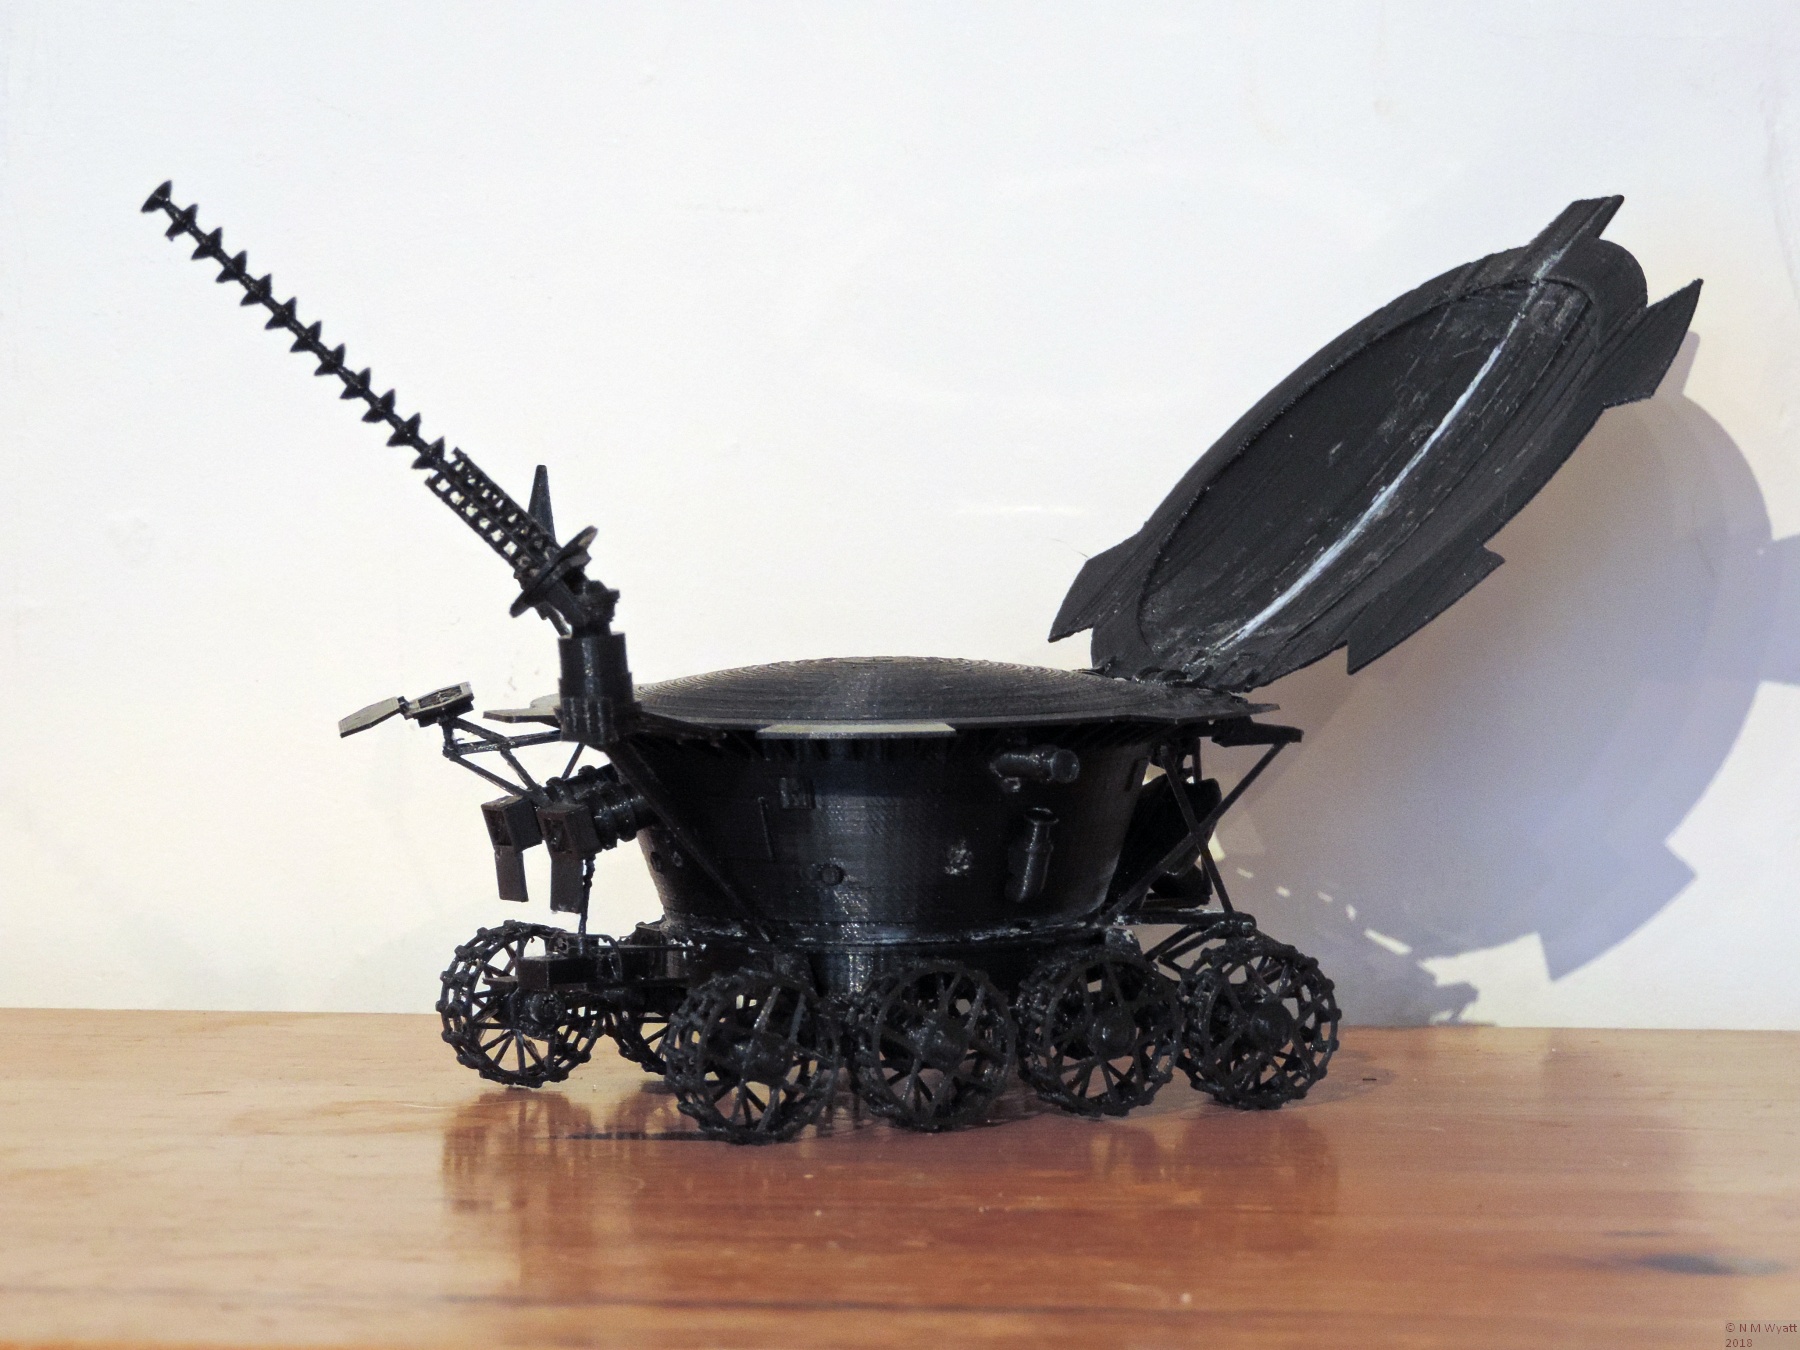
My model is based on the exceptionally useful plans at spacemodels.nuxit.net/lunokhod and I fully acknowledge Vincent Meens as my main source for dimensional and constructional information on the Lunokhod. That said, the pdf files on his website were unsuitable for making a 3D digital model, so I redrew the rover entirely in TurboCAD from scratch. I have modelled Lunokhod 1, as I was becoming stir crazy and did not have the patience to add all of the extra accessories for Lunokhod 2.
I have not yet finished painting Lunokhod, I will add a photo when the job is complete.
A note on the STL files.
I hate the poor quality STLs on many 3D sharing sites that are impossible to print. All of the STLs in this zip folder have been printed at actual size (dimensions in millimetres) WITHOUT SUPPORTS. That said, many of the parts are not in an optimal orientation for printing and will need to be arranged to suit your printer.
The exceptions are:
- The low gain antennae. these are just too thin to print, I suggest you use four bits of wire.
- The lid, which needs to be rpinted as two halves on tehir sides, and glued together - you can see the seam in the photos.
- The model of Lunokhod as a whole, this is just to give you a guide as to how it should look.
You WILL need to be careful and creative in the use of cyanoacrylate glue to put everything together. I have NOT included assembly instructions, reference to Vincent Meen's drawings, photos of Lunokhod 3 and the STL of the assembled Lunokhod should be enough to guide you in assembling the model.
My basic print settings were PLA, 0.14mm layers, 0.56mm top and bottom layers, 25% fill and 0.8mm skin width (0.4mm nozzle). The printer was my Prusa i3 made from a Factory3D kit, these are UK made and rather better than the stock acrylic frame kits and cost about 50% more.
STL Files for Printing Your Own Lunokhod

Lunokhod 1 3D by Neil Wyatt / Stub Mandrel is licensed under a Creative Commons Attribution-ShareAlike 4.0 International License.
- Details
- Category: 3D Printing for Model Engineers
One of the big challenges in astrophotography is achieving really accurate focus, easiest and fastest way of doing this is with a Bahtinov Mask. there are amny ways of making your own masks, but a robust, accurate and convenient solution is 3D printing.
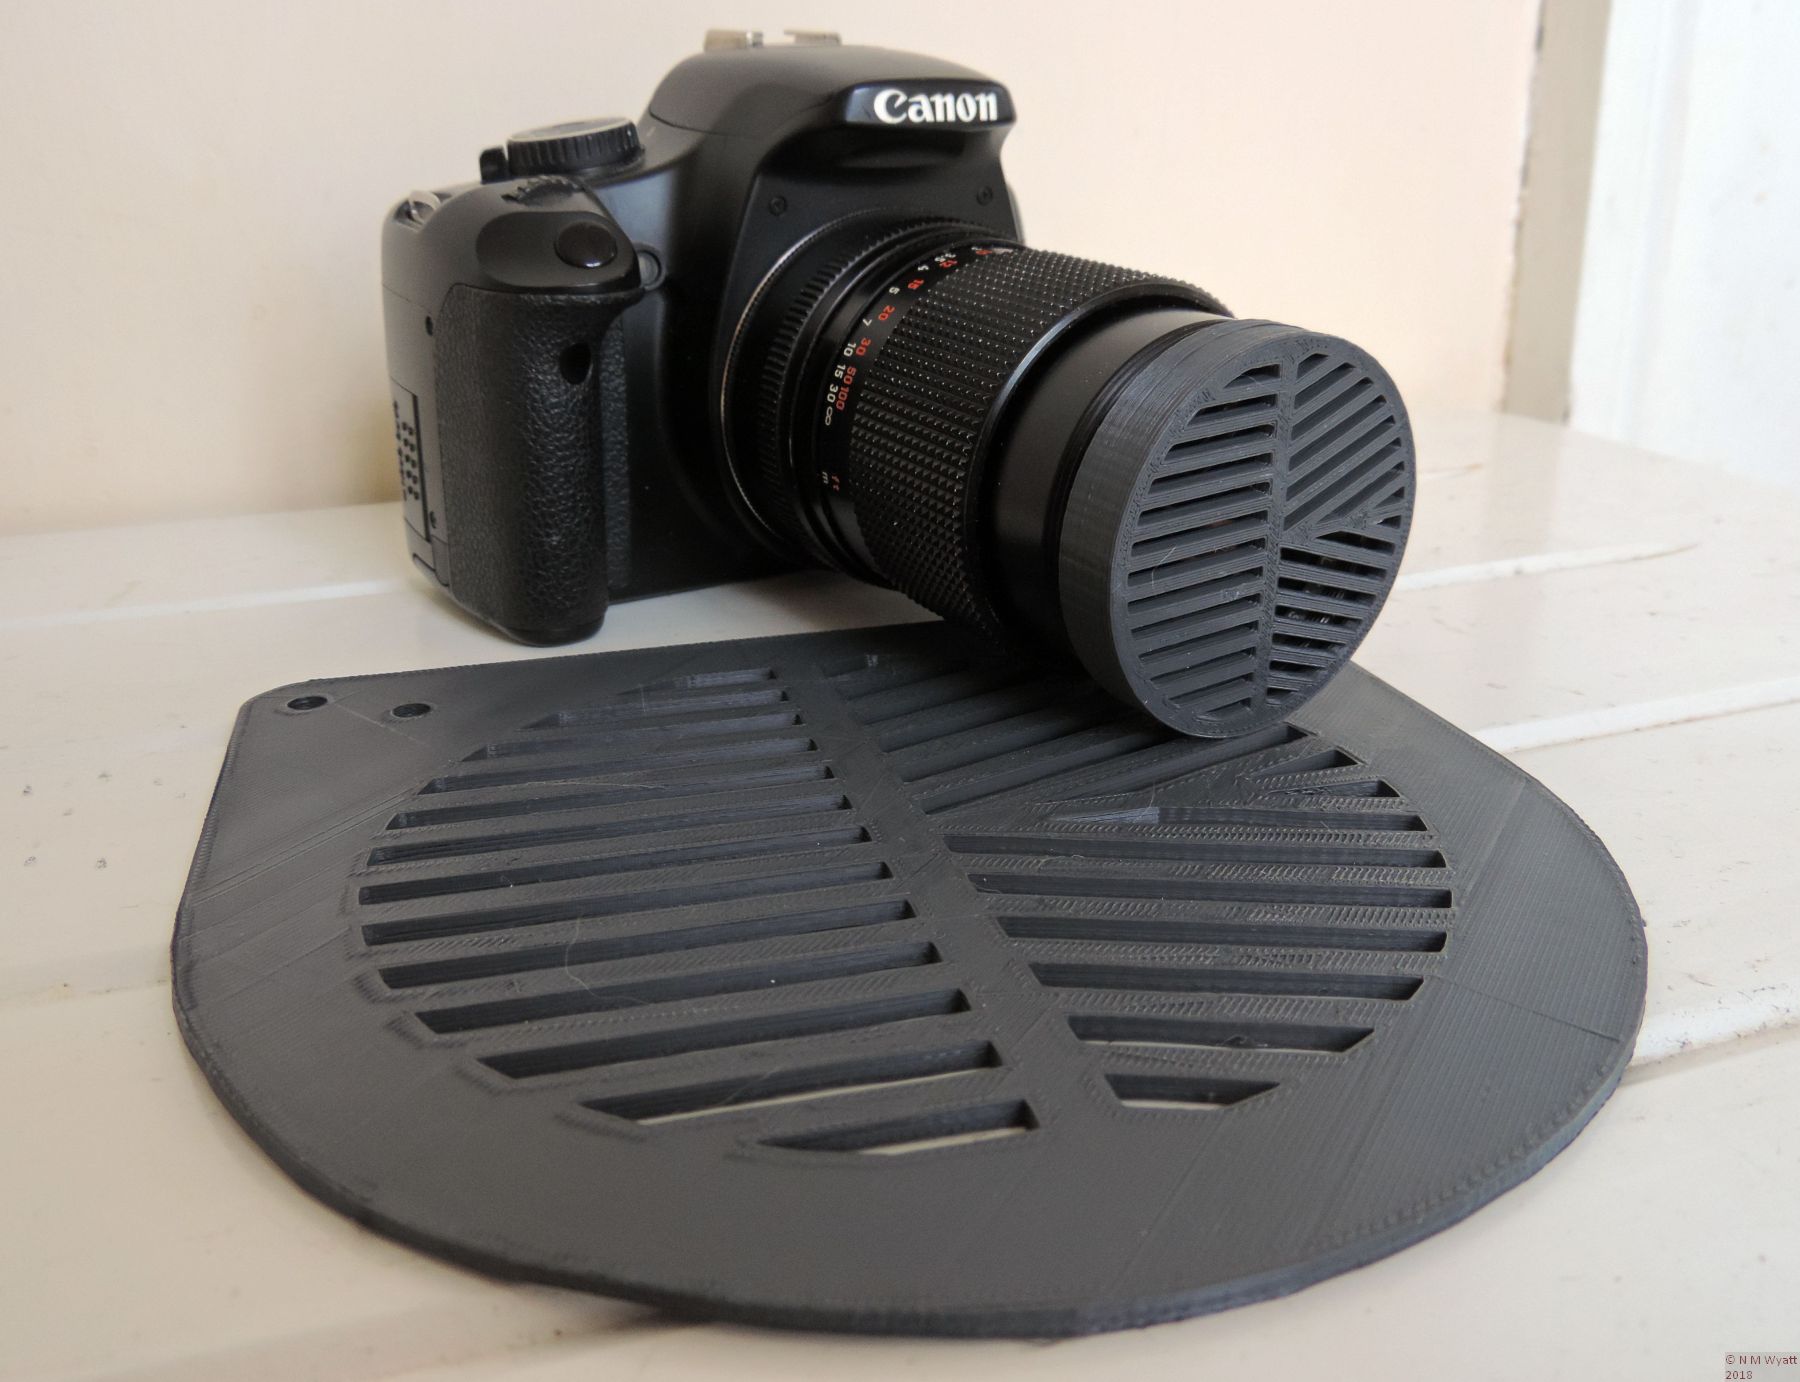
See THIS PAGE for details of how to use a Bahtinov Mask.
Here are STL files to allow you to 3D print your own Bahtinov Mask for some popular sizes of lens and telescope:
Mask.stl for 130mm reflectors with a roughly 150mm/6" tube, such as the Skywatcher 130P and 130P-DS.
Small-Mask.stl for telephoto lenses (catadioptric and conventional) with a 76mm end diameter.
Tiny-Mask.stl for short telephoto lenses such as the Zeiss 135mm F.3.5 'Sonnar' which take a 48mm filter and have an external diameter of about 52mm.
The largest mask requires two M6 nylon screws about 30mm long to be threaded into two holes, these allow it to be 'hooked' onto the end of the scope.
The smaller masks have an 8mm collar which is an easy fit over the end of the lens. if your scope/lens is a slightly different size, scale the X and Y dimensions (but not the Z-dimension) of the nearest-size mask to fit.
Masks can be used directly on a scope or on the end of a dew shield. They are not a close fit, they just 'hang there' so as not to disturb the focus/pointing when you lift them off.
These print best with quite a dense fill (30-40%) and thicker outer layers than normal.They don't need to be black, just opaque.
My masks were printed on a Prusa i3.
Don't forget to remove the mask before taking photos!
- Details
- Category: 3D Printing for Model Engineers
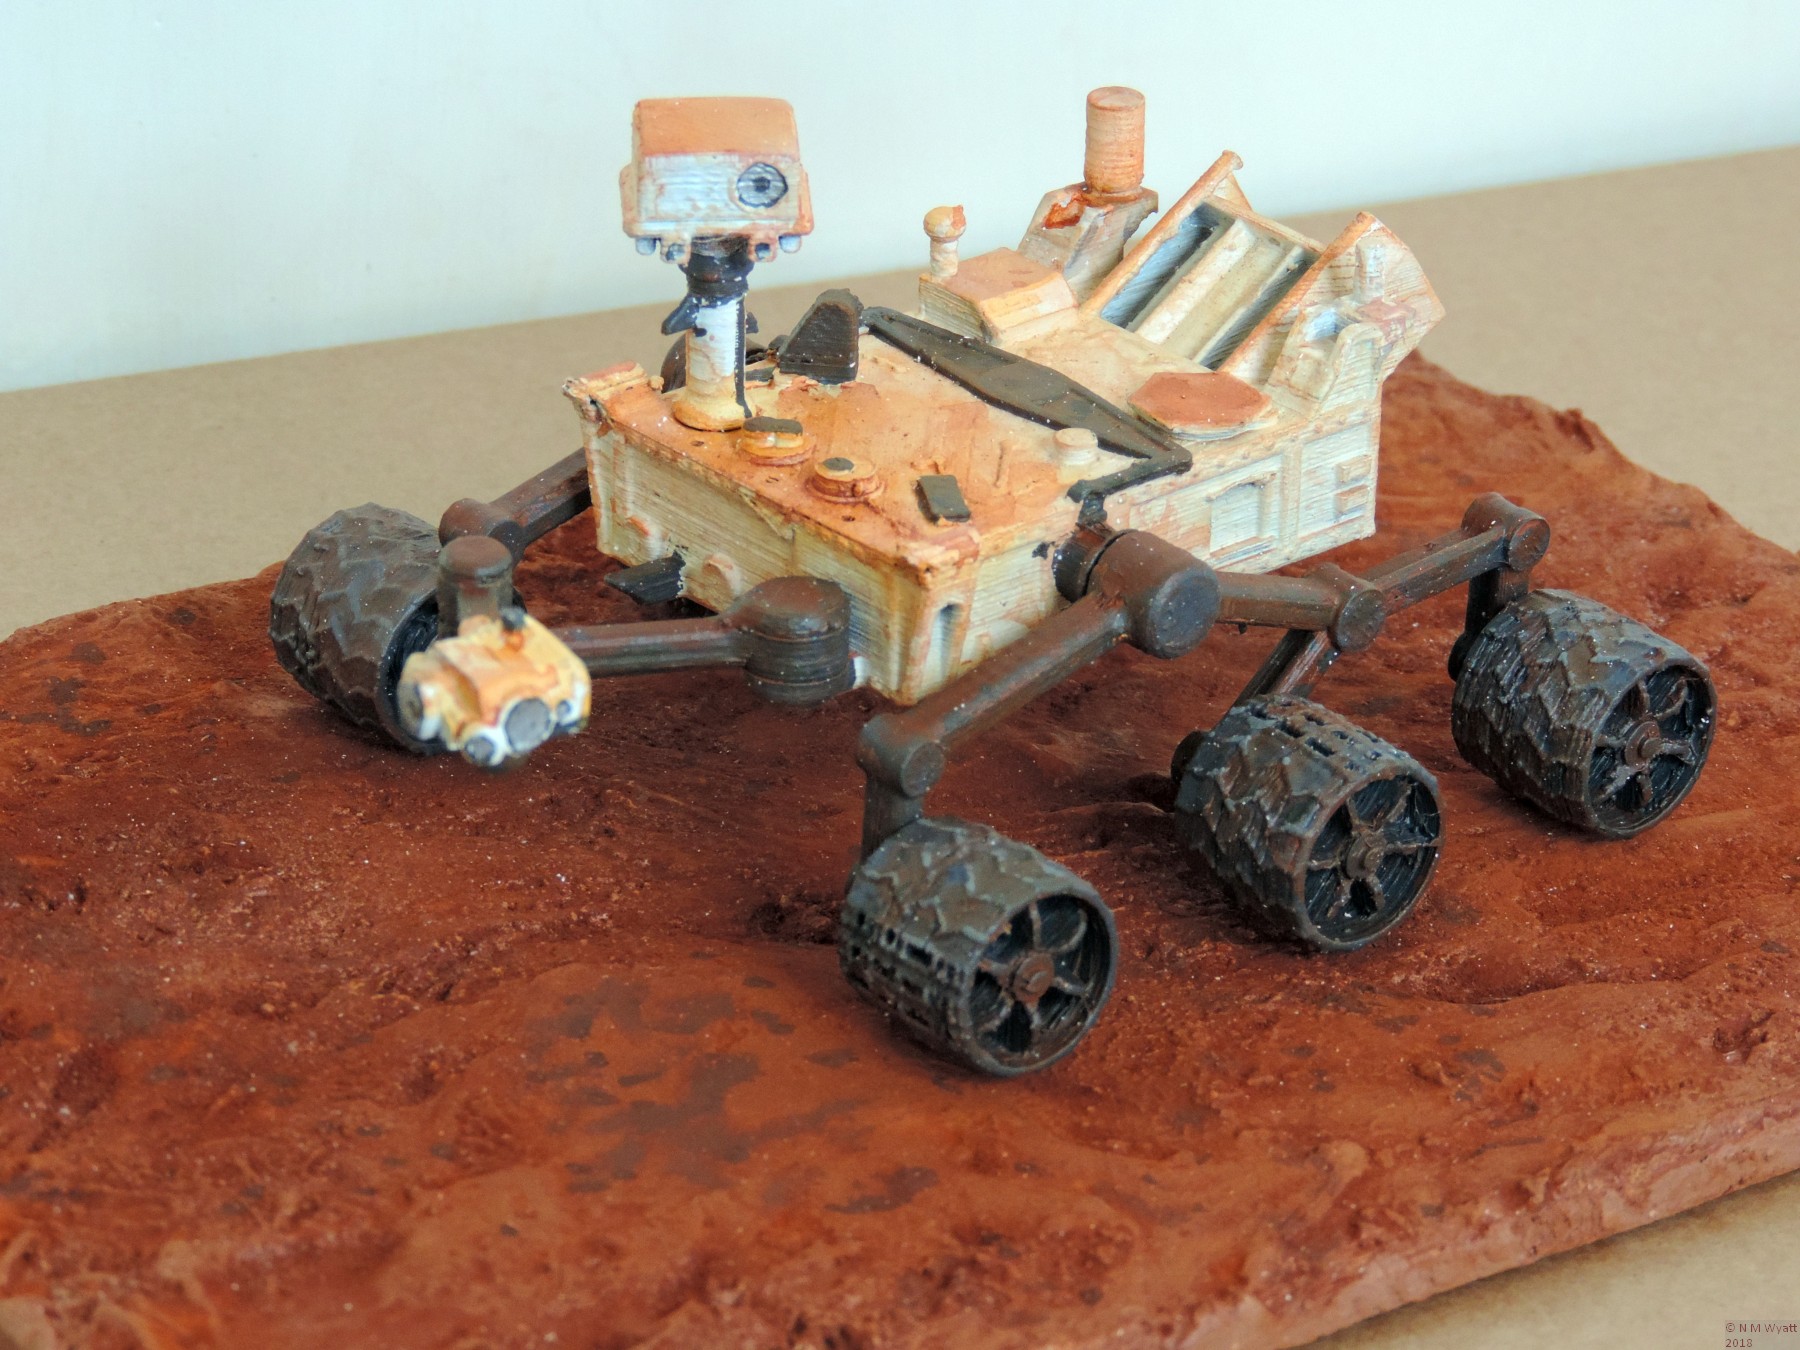
This is a model of the Mars rover, Curiosity, made up from 3D printed parts produced on my Prusa i3.
I obtained the STL files from NASA's collection of printable 3D models. This is the smaller, less detailed version of the Curuiosity Rover, but it still looks great. I have afeeling i won't be able to resist printing teh larger, more detailed and accurate version!
- Details
- Category: 3D Printing for Model Engineers
Do you find that 0.004" / ~0.1mm isn't quite as fine a feed as you would like on your mini lathe?
When you want a really superb finish, use a pair of 100T change wheels instead of 80T with your 20T gears to get a fine feed of 0.0025" per revolution on an imperial mini lathe or 0.06mm on a metric one. Note that on some models of Mini Lathe you will need to modify or replace the gear mounting banjo to allow the larger diameter gears to be fitted.
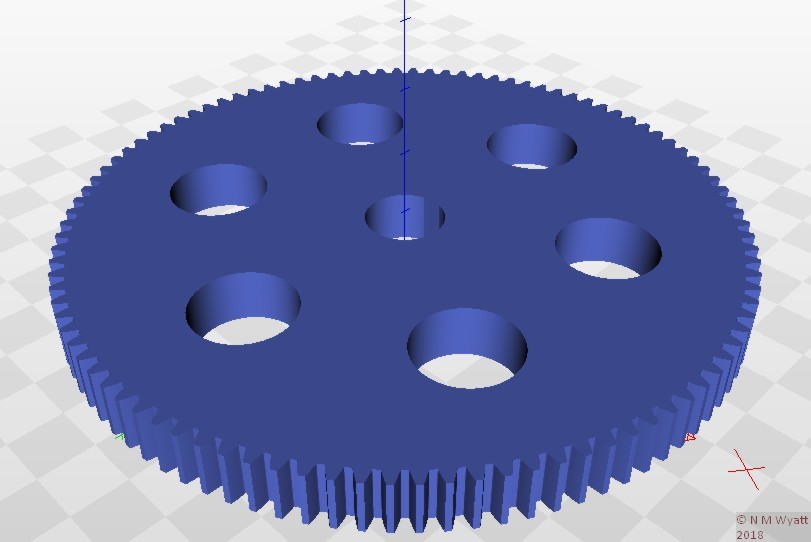
Download this STL file for 3D printing. It is a 100-tooth 1-mod gear , 8mm thick with a 12mm bore and a 1.5mm deep by 3mm wide keyway. Print two and you now have access to a really fine feed.
- Details
- Category: 3D Printing for Model Engineers
Page 2 of 2